Wednesday, December 29, 2010

Challenge #6 - It's Summertime!

Hello Everyone and welcome to another CopicOz Challenge!!  Since it is Summer here in Australia and Australia Day is in January, I decided to go with a Summer Theme this month and use some Yellow and Green!  It doesn't matter if it is a G, BG or YG - just some sort of green!  For this card I used yellow in the umbrella as well is some Yellow-Green and then Blue-Green in the water.  (Copics - Y21, YR23, E51, E21, YG91, YG95, BG10, BG15, BG18, B21.)  If you don't live in the Southern Hemisphere and you are currently experiencing cold and snow, maybe this challenge might warm you up a little!!  :)

What's the Challenge?: Create a project (card, layout, off the page) using your Copic Markers to create a Summer Theme using Yellow and Green ! Doesn't matter what image you use.  Show me what Summer means to you!!!  :)

Is there a Prize?: YES!!  This month it's really exciting - a Copic Ciao 12 Pack!!!  You can see the pack HERE!  Are you excited now!!!  :)

Who can play?: This challenge is open to EVERYONE, including international!

How do you enter?: Use the inlinkz below to connect to your blog or online gallery and upload it prior to 6pm Monday 24th January, Australian EST (4am USA EST)!!!

I can't wait to see what you create!!!

Hugs
Kathy  :)


Pin It

Tuesday, December 28, 2010

Christmas challenge winner

I am sending this blog post from my phone as i am having computer issues! So please forgive the short post!

The winner for the christmas with a twist challenge is Vicki b entry number 19!

Well done Vicki, your lollypop tub is so so cute!!! I love it!

Please email you postal address to me and we will send out your amazing prize!

I hope you all had a very merry christmas and a happy and healthy new year!

With love
Mandi-leePin It

Friday, December 17, 2010

Copic The Frog


Have you hopped over to our new Copic Marker Australia Facebook page yet?  We have just started a fun competition with Copic the frog! Using your favorite Copic products we want you to add life and colour to Copic the frog. Hop onto our Facebook page www.facebook.com/copicmarkeraustralia and become our friend. Then print the image onto you preferred paper or card, create a masterpiece and upload it to the Copic Marker Australia Facebook page by 5pm, Friday January 7th 2011.You could win a prize pack containing a Multiliner SP set, a 24 Copic Marker Wallet and a Copic Swatch Book. The winner will be announced on Monday January 10th 2011. Happy Colouring!
Pin It

Wednesday, December 15, 2010

Beautiful Botanicals!!

Hello Everyone and welcome back to another CopicOz Tutorial!  Here in Australia, flowers are in bloom and fragrance fills the air!  A flower is a beautiful image that is suitable for cards of all occasions and comes in a variety of sizes and colours.  Most people who follow my blog would be aware of my love of flowers, so today I'm going to show you how I colour flowers to give them depth and dimension.

Today I chose Poppies from JustRite Stampers' Plant a Little Love set.  They have been stamped in Memento Tuxedo Black onto X-press it Blending Card.  Like all images, it is good to decide where your light source (the tutorial Light Source can be found HERE) is coming from, mine is coming from the top right hand side.  Tip - If you are colouring a flower and you aren't sure of the colours it comes in - Google it!  Google Images is a great resource!  :)
 Most poppies are either red or a golden yellow.  Today I'm making mine red by using R22, R24, R29 and R59.
Usually when colouring, I would only do one petal at a time to avoid the ink drying too quickly.  It's easier to blend when it's still damp.  But for today's tutorial I'm doing it all at once.  First prime your paper with your lightest colour - in this case R22.
Take your next darkest colour (R24) and add colour to the places where your flower would be darkest.  In the case of most flowers, they will be darkest in all the creases of the flower where the petals join.  I'm also making it a little darker on the left hand side imagining the light is coming from the top right.
Blend with your lightest colour and then add your next darkest colour in the creases of the flower petals - I'm using R29 here.
Blend your colours together and then I want to add even more contrast, so I add a little R59 right in the creases.
When blending your colours always use your NEXT lightest colour.  So blending R59, I would use R29, then for R29 I'd use R24, for R24 I'd use R22 for the outer edges of the flower.  I've also added a little C7 in the centre of the poppy.
For the leaves, you follow the same rule.  I'm starting my leaf with G12 for the lightest colour.
Because the light is coming from the top right, the leaf will be getting quite a bit of shadow from the flower, so I'm making the top part of the leaf darker using G24 and highlighting the veins of the leaf as these are always darker.
Blend G24 with G12 and then for even deeper contrast, I'm adding G28 close to the petals where the shadow would be darkest and once again accenting the veins.

 Blend G28 with G24 and then G24 with G12 to give your leaf a smooth transition from one shade to the next.


Finally, finish your flower image using the same steps for adding shadow and you'll have a beautiful flower full of light and shadow which will give it a three dimensional look!

I hope you've enjoyed today's tutorial!!!
Hugs
KathyPin It

Tuesday, December 7, 2010

Adding Texture with Colorless Blender Solution

Good morning! I am Debbie Olson, a Copic Regional Certification for the U.S. Northern Midwest, and I am delighted to be a guest on the Copic Oz blog today. If you are like most Copic-loving paper crafters, you probably purchased a Colorless Blender in your first batch of markers. You might have even purchased a refill for your Colorless Blender at the same time.

While the blender pen is a fabulous tool, the blender solution, or Copic Various Ink 0 Colorless Blender, has some great applications as well, and that is what I would like to show you today. Almost any absorbent material with texture can be saturated with Colorless Blender Solution and applied to a smoothly colored area to create texture on your work.

Some of my favorites include sweaters, denim, bath towels, burlap, woven cloth, and even interestingly-textured paper towels. Obviously you would want to experiment with old scraps--not your best sweater! In the short video below, see how simple it is to create the texture on the mittens.


Stamps used in the video above are from the Sparky the Snowman set, courtesy of JustRite Stampers, and Nested Mittens die is from Spellbinders Paper Arts.


What textures can you think of that might work well with your Copic Colorless Blender Solution? Feel free to link any samples that you might create for your own blog or gallery in the comment section; we would love to see what you come up with!
Pin It

Tuesday, November 30, 2010

Skin Colour and EXCITING DATES FOR 2011!!!

Skin Colour Combinations is amongst the most asked questions I get as a Regional Instructor. As you know I looove colouring these gorgeous little people, and so skin colour is very important!

I have made this sample page for you to have a look at! It includes skin colour combinations from very light skin colour to dark skin tones. Please click on the image to enlarge the page!

When I colour skin I always start with my lightest colour first then pay particular attention to where my light sourse is coming from, so that I know where to add my darker colours. I then always go back to my original lightest colour to blend out my skin. I almost always finish off the face with a tough of R20 to add some blush to the cheeks!

Here is another sample of a gorgeous CC Design person that I have coloured using a lighter skin colour combination!

This project is part of a whole Copic Party Theme which has just been published! You can see the whole 7 page Copic Party in this months issue of Simply Cards Magazine!!!!


WE HAVE RELEASED DATES FOR CERTIFICATION AND THE NEW COPIC PROJECT PROGRAM FOR 2011!!!

We are excited to announce that dates for Copic Certification and the Copic Project Program have been released for early 2011. Additional dates (including dates for Intermediate Certification) will be released next year so keep checking www.copicoz.blogspot.com
For more information about the Copic Project Class see: http://copicmarker.com.au/certification/
Brisbane:
Monday 21 February - Copic Project Class – taught by Kathy
Sydney:
Saturday 12 March – Copic Beginner/Standard Certification – taught by Mandi
Sunday 13 March – Copic Project Class – taught by Mandi
Melbourne:
Saturday 26 February - Copic Project Class – taught by Mandi
Saturday 5 March – Copic Beginner/Standard Certification – taught by Mandi


Happy Colouring....Mandi xxx


Pin It

Tuesday, November 23, 2010

Skin Colour and NEW Challenge #5

NOW FOR THE NEW CHALLENGE!!!!

The new challenge for this month is "CHRISTMAS WITH A TWIST!"

You need to create a project with a Christmas theme....with an added twist! Now the twist may be an off the page project, or perhaps a card using nontraditional Christmas colours, or perhaps a twisted Christmas stamp! I will leave the twist part up to you! However, please make sure that this is still a COPIC based project!

Here is my little twisted sample!

Is there a Prize?: YES!! This month it's a Copic Swatch Book and a Mist It Spray!!!


Who can play?: This challenge is open to EVERYONE, including international!

How do you enter?: Use the inlinkz below to connect to your blog or online gallery and upload it prior to 6pm Monday 27th December 2010, Australian EST (4am USA EST)!!! The winner will be announced on Tuesday 28th December 2010!!!!

Good Luck...and Happy Colouring!!!
Mandi


Pin It

Feathering Winner!!

Hello Everyone!!!  It's that time again when we announce the winner of this month's CopicOz challenge!!!  This month I challenged you to feather and we did have some BEAUTIFUL submissions this month!!!  A HUGE thank you to all who participated!!!

Without further ado, the winner this month is......

Honourable mentions this month go to......
Alexis - how beautiful is the feathering on these feathers, gorgeous!

Darelle - soft and delicate colours and you can't see where one colour ends and the next begins!

And Mel with this stunning creation - check out that feathering, what a gorgeous combo!!!

Congratulations Lorraine!!!!  Please Email me with your postal details so we can send your prize to you!!!

Don't forget to pop by tomorrow because Mandi will have another fabulous challenge for you!!!  :)

Hugs
Kathy  :)
Pin It

Wednesday, November 17, 2010

Testing Paper

Like my previous post on Testing Ink, testing paper is equally important!  Not all papers are created equal - some will bleed and some won't blend.  You don't want to spend time working on a beautiful piece of work only to have it turn ugly!!

So - what makes a good paper for Copic Markers?  You want a paper that won't feather (spreading across the top - it's OK if it bleeds through the back), that won't over saturate too quickly, will blend colours well and the colourless blender will be able to move ink.  If it doesn't pass these tests, then you won't get the results you are looking for!

The first thing to do when testing paper is to draw a circle with your multiliner (if you don't own a multiliner, then stamp an image in ink you know is safe such as Memento).  Also ensure that you have clean scratch paper under your work - it is perfectly normal for colours to bleed through the back!

Next take a blending pair of colours - today I've chosen R22 and R24 - and use the lightest of your blending pair (in my case R22) to colour in the shape by colouring in circles.

Is your colour starting to move outside the line??  If so, this is not a good paper for you!!!  If your colour is staying put, then it's passed the first test!  I'm using X-press It Blending Card and I know the colours will not move on this paper (it doesn't count if you accidentally colour outside the lines LOL!!).

Next take the darker of your two colours - in my case R24 - and flick in the colour from one side.

On a good paper the colours will start to blend without any work, like this one!  To blend your colours, go back with your lightest colour and lightly blend where the two colours meet, but working in circles and flicking out to the paler side.

Did your colours blend??  Awesome - your paper has now passed the second test!!  :)  As you can see my two colours have blended beautifully together!  :)  The third thing you want your paper to do is to have the colours move when you apply your Colourless Blender - by applying the broad chisel nib to the centre of your circle, you colour should move.

If your paper allows the colour to move with the Colourless Blender, then your paper has then passed the third test!!

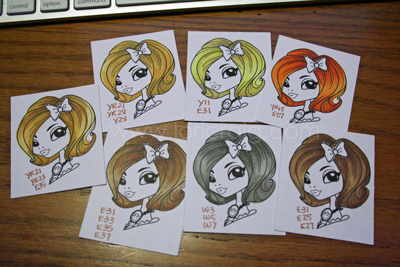
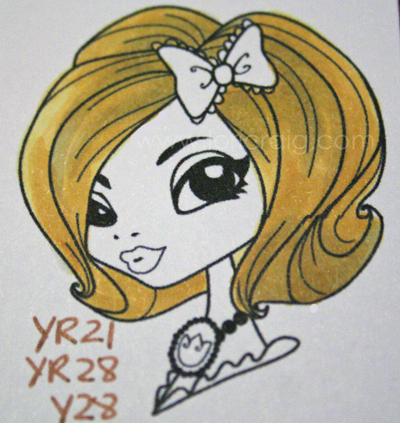
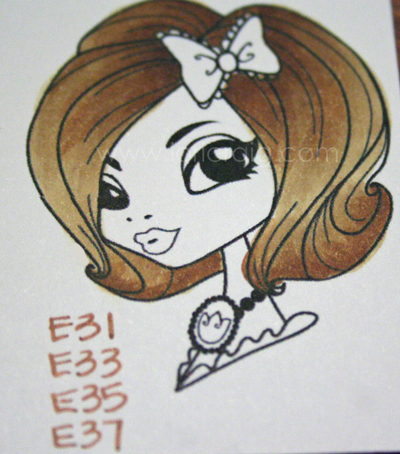
I have been asked a lot recently if paper type really matters and instead of explaining how you can get hugely different results, I made up these samples (coloured exactly the same) which now live in my sample book......

 This is plain old Tablex 200gsm paper that I found at a stationary store......YUK!!!!

Next is some Canon 250gsm (uncoated - not gloss) that was also found at a stationary store.


Now this one was ok with some colours (although in my opinion they don't blend particularly well), but on the Greens, Blue Greens, Greys and Reds they did bleed outside the lines.

Lastly I used X-press It Blending Card and got perfect results with every single colour, not to mention the colours are better and smoother too!!  :)

What a huge difference paper can make!!!!  :)  Hope you've enjoyed today's tutorial and see you on Tuesday for the winner of the CopicOz Feathering Challenge --- you still have time to play along and win!!!!  :)Pin It

Wednesday, November 10, 2010

Have a Good Hair Day!

all-samples_lcraig.jpg

Hello. Thank you for checking in with Copic Oz today. My name is Lori Craig. I am a Copic Certification Instructor in the United States. I had the incredible pleasure of meeting many of you when I was in Australia earlier this year for certification classes in Sydney and Melbourne. A few of you may know me from www.splitcoaststampers.com, where I work full-time. I'm excited to be a guest author for the Copic Oz team this week.

Hair is one of the tricky things I'm often asked about in Copic classes, and this is what I call a good hair day! Lily from The Greeting Farm makes an excellent hair model, don't you think? Hair color, whether in your very own stylist chair or on cardstock can be intimidating, so I've put together a few different color combos that work well.


yr15_e07-copy.jpg

Red head...

y11_e31-copy.jpg

Beach Blondie...

yr21_yr28_y28-copy.jpg

Classic blond...

e31_e33_e35_e37-copy.jpg

Brunette

w3_w5_w7-copy.jpg

And, finally, a gray beauty.

Many thanks to the Copic Oz team for asking me to stop by. I hope I've given you some new perspective today. I would encourage you to keep a sketch book and experiment with hair color options of your own. Make sure you make note of the color combinations that you use. Over time, you'll enjoy looking back at the sketches for reference and new inspiration.Pin It

Tuesday, November 2, 2010

Intermediate Certification and an EXCITING ANNOUNCEMENT!

Hi Everyone,

Well I am back .... I had a great trip to Chicago – where I met up with Marianne and the rest of the amazing Copic Team.


(Debbie Olson, Lori Craig, Marianne Walker, Sherrie Siemns, Bianca NDM, Sharon Harnist, Jenn Balcer, Me, Jennie Black and Colleen Schaan)


I completed the Intermediate Certification with Marianne .... and now can’t wait to teach the Intermediate Certification Program in Australia in 2011.

Intermediate certification will be a fantastic 1 day program covering colour theory, light and shade and much more. More details will be posted in 2011 - please keep checking copicoz.blogspot.com
I am also so excited to announce....
In addition to intermediate certification we will be launching the inaugural Copic Project Course. This will be a one day program, focusing on 3 amazing Copic projects. This will be an amazing opportunity to create 3 completed Copic projects, covering a range of mediums and incorporating a variety of techniques.
More information and upcoming dates and locations will be posted in 2011.
Mandi-Lee
xxx
Pin It

Wednesday, October 27, 2010

Challenge #4 Feather with me!


 Hello Everyone and welcome to the latest CopicOz challenge!!!!  This month I'm challenging you to do some FEATHERING!!!  I love to Feather, it's great for dresses, fairy wings, flowers etc...  The biggest thing to remember is to use two colours that has a last number finishing in a 0, 1 or 2!  Above I've used a CC Designs girl called Rosalie and Roses and coloured her dress with Y21 and YG11 - they both end in a 1!  For more tips on how to Feather, go back and look at my Feathering Tutorial Here.

What's the Challenge?: Create a project (card, layout, off the page) using your Copic Markers to FEATHER! Doesn't matter what image or colours you use. There are so many options to choose from!!!

Is there a Prize?: YES!!  This month it's a 24 Wallet and a Memento Rich Cocoa Ink Pad!!!

Who can play?: This challenge is open to EVERYONE, including international!

How do you enter?: Use the inlinkz below to connect to your blog or online gallery and upload it prior to 6pm Monday 22rd November, Australian EST (4am USA EST)!!!

I can't wait to see what you create!!!

Hugs
Kathy  :)

Pin It

Tuesday, October 26, 2010

We have a Winner!-All Together Spooky, Challenge

WOW,WOW,WOW...... what an amazing amount of entries we had this month for the October Monthly Challenge-“all together spooky”Halloween.Thankyou all so very much for playing along .
There is soooo many fabulously talented and creative people that choosing just one winner was very difficult ....but on that note...

Drumroll please........The winner is.......

***********#22Kelly***********
Can you believe this entry...so much work and effort went into Kelly’s creation,it is absolutely stunnning and blew us away. Well Done Kelly
Please email your full name and address to james-ee@hotmail.com so we can post out your fabulous prize to you and email you your award badge to proudly display on your blog..We know you will love your Copic Colouring Swatch Book.
The other cards that we were very impressed with and thought deserved an honorable mention are:

#31 Susan Maloney
and #3 Kylie
Trust me when I say to all of you who entered , your creations were extremelly wonderful!
So a BIG, BIG Thankyou to everyone who entered the challenge, and remember to please “POP” on back tomorrow for the start of the next Challenge, hosted by the the Lovely Flower Guru , KATHY!!!

mmmmm..... i wonder what she has planned for us all.......
Have a Great Day and Happy Stamping,
Debra,xxxx
Pin It

Wednesday, October 20, 2010

Nothing but Blue Skies...

Hello Everyone and welcome back to another CopicOz Tutorial!!!  Today I'm looking at how to create skies with your Copics!!

I have to admit, when I started with Copics, sky was one of the things that really worried me!  How do you get a sky to look good??  There are a few options depending on the look you want.  Today I'm using a B000 Marker and the Cardinal image from JustRite's Backyard Birds set.  It's been stamped in Memento Tuxedo Black onto Xpress It Blending card.

I used the B000 Copic Marker to colour in circles working my way around the image.  I didn't worry about avoiding the branches because blue is in green and will easily be coloured over later.

I used G24 and G28 to add pine needles to the branches.

So what if you want a softer look?  I stamped another Cardinal and this time decided to use the Airbrush system, once again using the B000 Copic Marker.  To cover the Cardinal while airbrushing, I've made a mask using the procedure that Debra explained last week.  You can find that HERE.

So with the Cardinal covered with my Mask It mask, I set to work colouring with the airbrush.  See how much lighter the colour is when it's airbrushed?

Once again, I coloured the branches using G24 and G28 - look at the different effects that can be achieved using exactly the same marker!!!

Other effects that can be achieved with masking is creating clouds!  By die cutting the Mask It with a Label 6 Nestabilities die and airbrushing with B34, you can get a different look again!


Once you remove the Mask It, you can see the sharp outlines left behind.


You can then move the Mask It around and create different clouds in the sky by lightly airbrushing around them.

But skies don't have to be blue - think of the amazing colours of a sunset or dawn.....or as the skies have been around here lately, grey and stormy!!!  Give it a go yourself and leave a comment here on the blog so we can see what wonderful creations you've made with skies!

Hugs
Kathy  :)
Pin It

Wednesday, October 13, 2010

Masking! The possibilities!

Hi everyone, today I am going to share with you a tutorial on "Masking" your images.
Masking is a very simple to do and gives a very effective look.
What you need is....
Character stamp, Background Stamp, Sharp Scissors, X-press it Blending paper, Scrap photocopy paper and  "MASK IT"  tack Film
First off you need to stamp 2 of the same image, in this case I have stamped 2 little witches. One is stamped on X Press it Blending paper and the other on any scrap/photocopy paper you have. The "scrap" paper is what you will apply your "Mask it"- Tack film too.

Scrap Paper.......Blending Paper
Note..... Test your X Press "Mask it" paper first on the scrap paper first to make sure it does not pull up the fibres of your scrap paper. If you find that it does then gently touch the X Press "Mask it" to your clothing as this will make it less tacky/strong, then place onto your scrap paper image.

 Cut around the image you have applied the "Mask it" Tack film too,(scrap paper) remembering to stay  on the lines when cutting.
 Peel off your "Mask it' tack film off from the scrap Paper and apply this carefully, making sure you have it alligned perfectly to the image on your X Press Blending paper.
Little hard to see but the mask is over the image.
Now.... you can stamp any other image over the top of this,in this case I stamped the moon over my image and when you remove the "Mask it" Tack film you will be left with a perfect image customized to your liking.

Masking your images opens up so many possibilities.
Just a reminder about the challenge here at COPICOZ for this month" all together spooky'-Halloween . You still have a quite few days to get your entry in and who knows you may get to be one of the first to own your very own Copic Colour Swatch Book
Sun and Frog- Magnolia Stamps..... Witch-CC Designs.
Happy Stamping, Debra xxxxxx

Pin It