
Grunge Splatter Background
For this technique you will need several colours of Various Ink, Colorless Blending Fluid, a mini mister, a non-stick craft sheet or waxed baking paper and glossy or coated cardstock.

Drip about 5 drops of each colour (I used V28, V06, V17) onto the craft sheet, making sure the droplets no not touch.

Add a little of the Colorless Blending Fluid to a mini mister, and spritz ink on craft sheet - this is very important, if you forget to spritz you will end up with 'spots' of intense colour. Spritzing ensures the colours move and blend a little.

Make sure you only spritz a little, add too much and your colours will be very pale. As a rough guide - I used 4-5 pumps of the mini mister nozzle.

Place card glossy side down, onto the ink drops, then press down gently with fingers to make sure you have contact. I like to then drag the card through the ink to pick up the colour.

Turn card over to check the coverage you have achieved, you may like to leave the white areas, I prefer to keep swiping the card through the remaining ink until most of the white is covered.

When your card looks something like this you are ready for the final step.

Spritz some of the Colorless Blending Fluid onto the tips of your fingers.

Then 'flick' the blending fluid onto your card, the more fluid on your fingers the larger the droplets, for finer droplets either flick with more force or use less blending fluid. I like to have a mix of large and fine droplets. Wait about 1 minute for the pattern to fully develop before deciding if you want to add any more blending fluid.

I consider my background complete when it looks a bit like this.

You could die cut this to use on a project, use it as a layer or even stamp directly onto this using an oil based ink pad like Archival ink, to create a simple but stunning card. This technique can also be used on clear acetate for fabulous results and looks simply beautiful when used as an accent panel.
Now, my next background is fun - heaps of fun and there are so many ways you can adapt this idea, though you will need a Copic Airbrush. I currently use the X-Press It Air Compressor Auto - which I adore, though this technique will also work with any of the Copic Airbrush kits.
Stencil Background using the Copic Airbrush
For this technique you will need several colours of Copic Marker, Colorless Blending Fluid, a mini misting bottle, a Copic Airbrush, a stencil or template and X-Press It Blending Card.

Start by airbrushing your palest colour (which in this case was YR09) onto the blending card - don't cover the card, just add colour in patches like I have.

Then add your deepest colour (R37) with the air brush, overlapping the colours a little - you should still have some white areas at this point.

Next add an intermediate tone (R17) again overlapping colours, this helps any visible lines or edges disappear. You should still have a little white.

Finally add a bright, strong colour (RV09) filling in all remaining white areas and use this same colour to blend any lines, patches or edges between the other colours. I know this is bright, but you will find that the brights and dark colours work best for this technique.

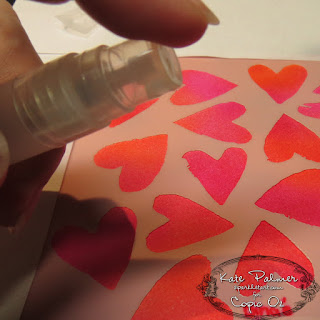
Fill a mini mister with Colorless Blending Fluid and tape a stencil over your background, make sure your stencil or mask will not move about during this next step.

Carefully spritz the airbrushed card with the blending fluid - very lightly. You can always go back and add more later, but if the liquid seeps underneath the stencil then your design will be ruined. Lightly spritz, then wait for a minute to see if more blending fluid is needed, if it is, lightly spritz again. Very rarely, will you need to spritz a piece more than twice.
No need to wait, you can carefully remove your template from the card right now - and you will have a wonderful background with a pattern or design all in coordinating colours.

I'm hoping you have as much fun making these backgrounds as I did and that you have enjoyed my first post for Copic Oz.
Start by airbrushing your palest colour (which in this case was YR09) onto the blending card - don't cover the card, just add colour in patches like I have.

Then add your deepest colour (R37) with the air brush, overlapping the colours a little - you should still have some white areas at this point.

Next add an intermediate tone (R17) again overlapping colours, this helps any visible lines or edges disappear. You should still have a little white.

Finally add a bright, strong colour (RV09) filling in all remaining white areas and use this same colour to blend any lines, patches or edges between the other colours. I know this is bright, but you will find that the brights and dark colours work best for this technique.

Fill a mini mister with Colorless Blending Fluid and tape a stencil over your background, make sure your stencil or mask will not move about during this next step.

Carefully spritz the airbrushed card with the blending fluid - very lightly. You can always go back and add more later, but if the liquid seeps underneath the stencil then your design will be ruined. Lightly spritz, then wait for a minute to see if more blending fluid is needed, if it is, lightly spritz again. Very rarely, will you need to spritz a piece more than twice.

No need to wait, you can carefully remove your template from the card right now - and you will have a wonderful background with a pattern or design all in coordinating colours.

Kate Pin It


