Wednesday, October 30, 2013

Copic Journal Cover

Hi again - today's project has quite a few steps but the results make it completely worthwhile!  Now a few of you may be familiar with the work of amazing  Polish artist Anna Dabrowska - better known as Finnabair, well today I am taking inspiration from Finnabair's unique complex style and creating a cover for my new Copic Journal.

You will need to gather some materials to embellish your journal cover: metal, plastics, embellishments, papers, lace, charms, wood, chipboard - whatever you would like to incorporate onto your design.  I am using my X-Press It Blending Journal, a variety of lace, Chromacryl white acrylic paint, chipboard shapes from FabScraps and a variety of brass charms and paper flowers.

**Normally it is recommended that you apply your Copics first BEFORE paint, pencil or any other mediums, so they won't become clogged. Before you start, you do need to be aware that when using your Copic Markers on some surfaces you need to understand the nib may become blocked by repeated use over paint and you accept that you will need to periodically replace the nib. It is a good idea to have a few Copics that you use ONLY for mixed media work.**


Paint the journal cover with the white Chromacryl acrylic paint - I used 2 coats allowing each to dry before continuing.  Once dry use the fabulous TripleTac glue from X-Press It to adhere your embellishments to the journal cover - allow this to dry thoroughly before continuing.  
This is what mine looks like.

Once dry cover everything with white Chromacryl paint and leave to dry.  You can add a little texture paste for extra interest at this point if you like.


Spray with your favourite sparkly sprays and let dry (this saves a little Copic ink as it adds a base layer of colour, it also adds a little bit of sparkle to the final project).  
Using a Copic airbrush spray BG34 over your cover to colour any light/white areas.

Spray YG25 to about 1/4 of the cover - this can either be randomly or you can choose to colour individual elements.

Still using your airbrush, add V04 to a few places and colour some of the elements eg: flowers or bird - this adds a beautiful contrast to the greens and blues

Add BG49 to darken the colours.

Now this is where things get really interesting!  Using the special properties of Copics and the Copic Blender you can achieve some exciting special effects.  

Before adding any final colours, use a stencil and the X-Press It Clear Gel Glue to apply a design to some of the areas without embellishment.  I also used the Clear Gel Glue to cover some individual elements to highlight them, leave this for several hours or until completely dry.

This results in gorgeous shiny areas (keep reading to see why this is an important step).


Spray BG09 around the edges of the cover - darkening the edges draws your eye to the more colourful area in the centre.  Go ahead and use your airbrush to spray right over the top of the glue design.

Add E47 to the edges and to some of the central designs, again this helps draw the eye.

The final colour E49 is only sprayed on to the very edges, and to the central frame - go ahead and spray this well, getting into all the nooks and crannies.

Use the Copic Blender for the next steps - the special effects!

Using the blender brush tip, remove the excess colour from the top of the gel glue elements (make sure to scribble to colour off your blender in between) - this will reveal the original colour underneath which is paler, creating patterns which POP!

Then use the chisel nib to remove colour from the highest points of some of the textured embellishments eg: frame, bird etc, this will reveal the colour underneath and leave yummy darker colour around it (using this flat nib ensures you only touch the very top of the design - resulting in a beautiful colour contrast - just don't press too hard!).

As a final step flick a little of the Copic Various Blending ink onto your project (I add a few drips onto my fingers and just flick this on) - this will add just a little more texture and interest to the final piece.

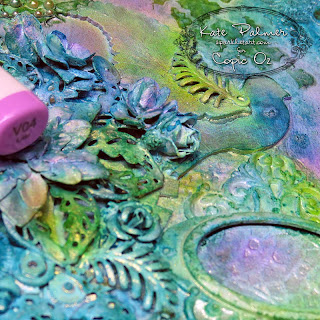
 Once all the colour is dry and you have finished removing colour using the Blender your project will look something like this up close, aren't those colours amazing - the Copic ink even blends and layers over paint!

and this is what my finished journal cover looks like....


Products used on this project:

  • Copic Markers: BG09, BG34, BG49, V04, YG25, E47, E49 and Colorless Blender
  • Copic Air Compressor
  • Copic Colorless Blender Various Ink
  • X-Press It: Blending Journal, Clear Gel Glue and TripleTac Glue
  • Chromacryl White Acrylic Paint
  • FabScraps chipboard shapes, lace, watch parts and other embellishments (metal and acrylic)
  • Optional - your favourite sparkly spray as a base - for a matt finish omit this


I just love the amazingly vibrant results achieved with the Copics on this project and the special effects achieved with the Blender make it just that bit more special.  I hope this inspires you to have a go at this technique for yourself, I can promise it is loads of fun and the results as you can see are fairly impressive.

I'd love to hear what you think of my journal cover,  I'd also love to see how you've decorated your Copic Journal covers so why not post a photo of your decorated X-Press It Blending Journal over on the Copic Australia Facebook page.

Kate

Pin It

Wednesday, October 16, 2013

Making Cupcake Toppers


Hello Everyone and welcome to another Copic Oz Tutorial!  Today I'm going to use Flourishes new Pinwheels and Popsicles stamp set to create Cupcake Toppers!!  Such fab projects to add a splash of fun to any celebration!!

Firstly I've started by stamping the ice-cream in Memento Tuxedo Black onto X-press It Blending Card and laid down a base colour of E50.


Then add some shading with E51.


Deepen the shading with E53 and lightly blend with E51.


I like a lot of contrast, so I've deepened the shading even more with E57, once again blend with E53 and E51.


I've made this a strawberry ice-cream and laid down a base of RV00.


Add some shading with RV02 and lightly blend with RV00.


Deepen the shading with RV04 and lightly blend with RV02 and RV00.


For your yummy cherry on top, start with a base of R32.


Add shading with R35.


Deepen the shading with R37.


For more contrast add some R39 and lightly blend with R37, R35 and R32!  I don't blend my reds until I've laid down all the colours.  Reds have a tendency to bleed, so I find it's better to leave the blending until the end.  If you do find the colours start to bleed, at least with this image I'm going to cut it out for the finished project! ;-)


So now that we have a fabulously sweet strawberry ice-cream, what are we going to do with it??  Cut it out, grab a toothpick and a couple of notched tags the same size! 

Stamp the sentiment from Flourishes' Pinwheels and Popsicles onto one and the glue the two tags together with the toothpick in between.  A strong glue like X-press It Clear Gel Glue is perfect!  Fussy cut the ice-cream you've coloured and pop it up on X-press It Foam Tape!


Want to step it up a little?  Why not take a Popstick, create a rosette, a notched tag and a couple of decorative circle shapes!


Glue the popstick and circle to the back of the rosette.  Attach the decorative circles together, fussy cut the ice-cream and stamp the sentiment onto the notched tag and assemble!


Why give your party that added extra fun by creating your own fabulous cupcake toppers and wow your guests (not to mention having a lot of fun preparing as well)! 

I hope you've enjoyed today's tutorial, thanks for visiting and happy colouring!!

Pin It

Wednesday, October 2, 2013

Creating your own Stencils and Masks, using Acetate, Lace and Mask It

We are going to have a play - no stress and practically no experience required to be able to create along with today's post. Today I will be showing you how to use masks and stencils with your Copic Markers and Copic Airbrush to create stunning backgrounds for cards or pages.  Once again I will be creating in my gorgeous X-Press It Blending Journal - but you can also use X-Press It Blending Card.


To play along you will need:
  • Clear Acetate sheets
  • X-Press It Blending Journal or X-Press It Blending Card
  • Copic Sketch markers
  • Copic Colourless Blender n in a small misting bottle
  • X-Press It Mask It
  • Copic Airbrush System (either travel or compressor unit)
  • lace or doilies


Before I go on - let me clear up something that is often a bit confusing - what's the difference between a Mask and a Stencil?


Wikipedia defines a Stencil as 'a thin sheet of material, such as paper, plastic, or metal, with letters or a design cut from it, used to produce the letters or design on an underlying surface by applying pigment through the cut-out holes in the material. The key advantage of a stencil is that it can be reused to repeatedly and rapidly produce the same letters or design.'
EG: using a 'hello' stencil would result in colouring the word 'hello' onto your project as shown below


A Mask is the reverse of a stencil and is defined as 'a covering to hide or guard .'

EG: using a 'hello' mask would result in colouring the SPACE around the word 'hello' on your project, you would get a white hello as shown below.


Using Acetate and X-Press It Mask It  I have used metal scrapbooking dies and a die cutting machine to cut some images and shapes to create  masks and stencils to use with my Copic Markers and Copic Airbrush.


I have started by air brushing a few co-ordinating colours onto a page in my X-Press It Blending journal, I like to start with some colour on the page so that the images are not too stark.

E15, BG15 & V15
Lay an acetate stencil over the background and using airbrush spray BG49 through stencil, add patterns randomly to background.  As you can see below the acetate stencil allows a little of the Copic ink to sneak underneath resulting in speckling of the colour - a soft edge - this is more noticeable on the stencils, but occurs on both acetate masks and stencils as the air can slightly lifts the acetate as you spray.

Acetate Stencil - produces soft edges

Lay Mask It mask over background (sticky side towards paper) and press down to ensure good contact with the card.  Using the Copic Airbrush System, spray with V15.  When you remove the mask you will notice that the edges are clean and crisp - a hard edge.


Depending on the effect you are after you may find one of these products more suitable than the other when airbrushing with your Copics.  Mask It = crisp image, Acetate = soft edge to image

Things to note: 
Acetate is reusable and when used exclusively with Copic inks should last quite a while,
Mask It is more fragile and may only last for a few images before it tears.

Of course you can use both of these products together on your Copic projects combining the soft and hard edges and overlaying and overlapping stencils and masks for wonderful effects like this.


Now masks and stencils are not only die cuts made from Acetate, plastic or Mask It, you can also use household objects or even fabrics!  You can get stunning effects by using lace - even nanna's old doilies hiding in the cupboard, can get a second lease on life with this technique!

 On this page I have begun by laying down a single colour over the background.

Background of BG15

Lay lace over coloured page and using sticky tape secure in place (this will result in a crisper image).  Using Copic Airbrush spray BG49 through the lace onto your page.

Add BG49
 Leave lace in place and spray N7 over the edges of the page through the lace - this will add a darker border.


Remove the lace and your background will look like this. 


As an added bonus you now have this stunning piece of coloured lace you can use on other projects.


For something different add a brown into the mix to contrast with the pastel colours.


The N7 is on the top and the E15 is on the bottom to show you the difference between adding in a grey and adding in a brown - I think both look gorgeous.


Don't forget you can use the Copic Colourless Blender to add interest by laying a piece of lace over the background and spritzing the Colorless Blender over the top - this will result in an interesting effect essentially creating a bleached halo around the lace.


I've gone and added a little lace work to my masked page and a few masks and stencils to my lace page  - to create a seamless 2 page spread in my Blending Journal.  When combining both ideas (masks, stencils from acetate and Mask It & using Lace) you can create stunning backgrounds like this - imagine this as the background for your card, scrapbook layout or journal page!  


And surprisingly using the airbrush uses significantly less ink than colouring the same area with your actual markers.


You can see all of the individual elements combine to create gorgeous, yet distinct coordinating pages.


Both pages use the following Copic colours. 

Colorless Blender, V15, BG15, E15, BG49 & N7

I hope that this has given you a few ideas about how to use Acetate, Mask It and even lace to create stunning backgrounds using your Copic Markers.

Kate
Enhanced by Zemanta
Pin It